Monday, October 27, 2014

Yummy in a Jar

Who doesn't love miniture desserts? Well I can't resis them! Especially when it comes to apple pie!

Last weekend I had an pretty great weekend with some awesome girls and I wanted to make them a little something! With fall among us, I really want pie of all kinds all the time.  I get this way every year, but with eating healthy lately I don't want to spoil my hard work on dessert.  So I got to thinking there had to be a way to have pie without managing to overindulge.

Hello mason jars!

I figure people put all kinds of dessert into mason jars so I decided to put my apple pie recipe into pint sized jars and make everyone their own personal pie.

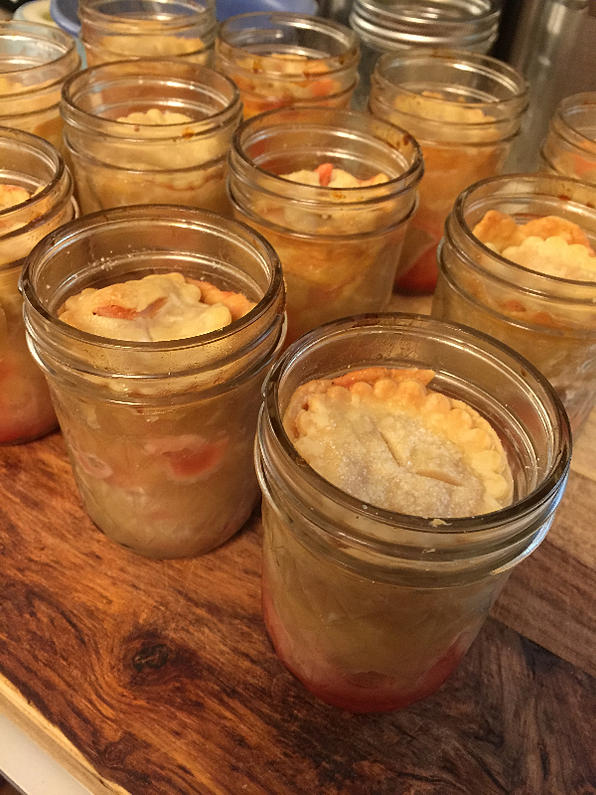
I started with pre-made pie crust (because let's face it- it was easier) and cut it into fouths.  Each mason jar got a fourth of the crust.  I used a wooden mortar to make the process of getting the crust into the jar just a tad easier.  Drape the crust over the mortar, turn the jar upside down, and then slide the jar over the mortar.  Then use your fingers to press the dough to the sides of the jar.  I probably spent way too much time on the crust since I was being a perfectionist and didn't want any holes.

Next, fill your crust with any type of pie you like! I filled mine with apple pie.  If you make a pie with fruit, be sure to dice the fruit up smaller than you normally would so it fits better in the jars.

Then, I used a cookie cutter to cut a piece of dough to put on the top pie to fit into the mason jar.

Here's a look at the pies before I put them in the oven.


I baked them for about 16 minutes a piece.  Be sure to let them cool completely before putting the lids on the jars.

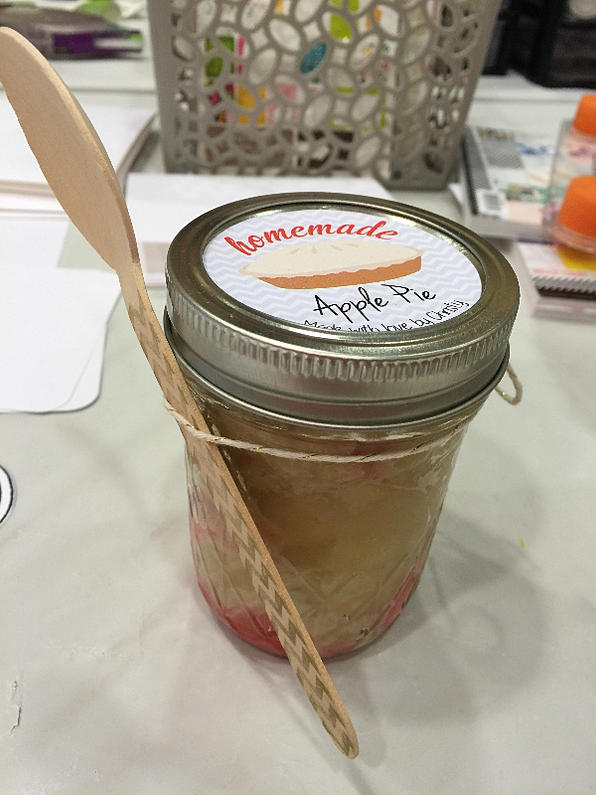
I then custom made labels with my Silhouette to put on top of the lids and tied some wooden spoons onto the jars with some twine.  Here is the end result!


I really enjoyed seeing everyone love their personal pies! Jennifer seemed to really like hers!


I hope mason jar pies are all in your future after this post!

Let me know in the comments below what your favorite pie is!

Tuesday, September 30, 2014

Everyone Needs a Little Glitter!

What girl doesn't like a little extra glitter? I do!

A few weeks ago my mom and I were hosting a bridal shower for a childhood friend of mine and we wanted to do something special for the favors.  I immediately took to Pinterest to look for a unique DIY gift.  I saw some glitter wine glasses and just had to make them!

Here are the supplies you will need:
  • Wine glasses (I got mine cheap at IKEA)

  • Acetone

  • Cotton balls

  • Martha Stewart Crafts Decoupage Glue in Gloss Finish

  • Martha Stewart Crafts Fine Glitter

  • Sponge Paintbrushes

  • Krylon Acrylic Spray Pain

  • Press n Seal or Saran Wrap

Step by Step:
  1. Clean the area of the glass you'd like to decorate using a cotton ball soaked in acetone.

  2. Use a foam paintbrush to paint a coat of decoupage onto the wine glass (I decided to only do the stems of the glass).

  3. Sprinkle glitter over the decoupage while it's still wet.

  4. Let the glitter and decoupage set.

  5. Repeat steps 2-4 if one layer of glitter wasn't enough.

  6. Let glasses sit overnight.

  7. The next day, use Press n Seal to "tape" off any part of the glass where there isn't glitter.

  8. Spray the Krylon Acrylic Spray over all the glitter in light even burts.

  9. Apply 3-4 coats of Krylon Acrylic Spray.

  10. Let sit overnight.

  11. Wash glass by hand, drink, and enjoy!

IMG_2511

We decidecd to put the girls names on the glasses with some ribbon and tags.

Hope you enjoyed this tutorial and can't wait to see what you create!


Please note: These glasses can only be handwashed.  We have washed ours a few times now and no glitter has been removed but be careful with cleaning them.

Tuesday, September 23, 2014

Zinzinnati!!

I promise I know how to spell Cincinnati! But this weekend was Homecoming for UC and our theme for Homecoming was Zinzinnati Oktoberfest! This year I was a float judge for the 3rd year in a row! I really enjoy judging the floats because I get to see all the work that went into them close up! Having a great seat to watch the parade helps too!

I really enjoyed that UC incorporated the Oktoberfest theme into Homecoming since it was also the same weekend in Cincinnati! It made for a great atmosphere and bigger crowds.

This year, since Nippert Stadium is under construction, our Homecoming parade was held down at The Banks between the Reds stadium and the Bengals stadium! I'm enjoying having this seasons games down at Paul Brown Stadium because we can tailgate and also have lots of restaurants and bars around the stadium for before and after the game!

IMG_2606


IMG_2611


IMG_2617


IMG_2620